不正な(malformed)HTMLテキストを修正する
Web上のHTMLテキストには不正な(malformed)形式を持っている場合があります。
malformedなHTMLテキストにに対してはBeautifulSoupやHTMLParserなどがうまく機能しません。
例えば以下の3つのパターンはBeautifulSoupでは例外が生じます。
1. タグの閉じ>が無い
<div class="invalid_start_tag"
  <a src="http://...">something</a>
</div>
2. 閉じタグに属性がある
</div class="invalid_end_tag">
3. scriptタグ中に閉じタグがある
<script language="javascript"><!--
  function splitTag() { return '</scr' + 'ipt>'; }
  //-->
</script>
Pythonの勉強ついでにパターン1,2を修正する関数formalize_htmlを作成しました。
パターン3については修正できていません。ただしHTMLテキストからのテキスト抽出などが目的であれば、scriptタグやコメントタグごと削除すれば問題は無いと思います。
勉強のために、doctestというものを試しに使用しています。
import re from sgmllib import SGMLParser _RE_SCRIPT = re.compile(r'<script.*?>.*?</script>', re.MULTILINE | re.DOTALL | re.IGNORECASE) def _remove_script_tags(htmltext): return _RE_SCRIPT.sub('', htmltext) _RE_COMMENT = re.compile(r'<!--.*?-->', re.MULTILINE | re.DOTALL) def _remove_comment_tags(htmltext): return _RE_COMMENT.sub('', htmltext) _RE_STYLE = re.compile(r'<style.*?>.*?</style>', re.MULTILINE | re.DOTALL | re.IGNORECASE) def _remove_style_tags(htmltext): return _RE_STYLE.sub('', htmltext) def _escape_htmltext(htmltext): escape_patterns = (('<', '<'), ('>', '>'), ('\'', '''), ('"', '"')) escaped_text = htmltext for from_text, to_text in escape_patterns: escaped_text = escaped_text.replace(from_text, to_text) return escaped_text class _HTMLFormalizer(SGMLParser): def __init__(self): self._data = [] SGMLParser.__init__(self) def unknown_starttag(self, tag, attributes): self._data.append('<{0}'.format(tag)) for key, value in attributes: self._data.append(' {0}="{1}"'.format(key, _escape_htmltext(value))) self._data.append('>') def unknown_endtag(self, tag): tag = tag.split()[0].lower() self._data.append('</{0}>'.format(tag)) def handle_data(self, data): self._data.append(_escape_htmltext(data)) def append_data(self, data): self._data.append(data) def get_data(self): return self._data def formalize_html(htmltext, keep_newlines=True, remove_scripts=True, remove_comments=True, remove_styles=True): ''' >>> malformed_htmltext = """ ... <html> ... <meta> ... <head> ... <title>TITLE</title> ... <script language="javascript"><!-- ... function splitTag() { return '</scr' + 'ipt>'; } ... function max(a, b) { return a > b ? a : b; } ... //--> ... </script> ... </head> ... <body class="invalid_start_tag" ... id="id_invalid" ... <img src="http://..."> ... <div> ... a > b ? a : b; ... </div class="invalid_end_tag"> ... </body> ... </html>""" >>> print formalize_html(malformed_htmltext) <BLANKLINE> <html> <meta> <head> <title>TITLE</title> <BLANKLINE> </head> <BLANKLINE> <BLANKLINE> <body class="invalid_start_tag" id="id_invalid"><img src="http://..."> <div> a > b ? a : b; </div> </body> </html> <BLANKLINE> ''' text = htmltext if remove_scripts: text = _remove_script_tags(text) if remove_comments: text = _remove_comment_tags(text) if remove_styles: text = _remove_style_tags(text) formalizer = _HTMLFormalizer() for line in text.splitlines(): formalizer.feed(line) if keep_newlines: formalizer.append_data('\n') formalizer.close() return ''.join(formalizer.get_data()) def _test(): import doctest doctest.testmod() if __name__ == '__main__': _test()
OpenOffice形式に変換する
OpenOffice形式(ODF:.odt, .ods, .odpなど)はZip圧縮された複数のXMLファイルなので、テキストを抽出したりするのが容易です。
一方、以前のMS Office形式(.doc, .xls, .pptなど)はバイナリ形式なのでテキスト抽出などは困難です。
なのでOpenOffice形式への変換方法などを調べました。
目的
MS Office形式(.doc, .xls, .pptなど)からOpenOffice形式(ODF:.odt, .ods, .odpなど)に変換したい。
解決策
下記の参考サイトを参考にして、OpenOfficeを使用してファイル形式を変換することにしました。
OpenOfficeにファイル変換用マクロを登録し、そのマクロを呼び出してファイル形式を変換します。
以下の2つのファイルを編集して、ファイル変換用マクロを登録します。
1. ~/.openoffice.org/3/user/basic/Standard/Export.xba
<?xml version="1.0" encoding="UTF-8"?> <!DOCTYPE script:module PUBLIC "-//OpenOffice.org//DTD OfficeDocument 1.0//EN" "module.dtd"> <script:module xmlns:script="http://openoffice.org/2000/script" script:name="Export" script:language="StarBasic"> Function MakePropertyValue( Optional cName As String, Optional uValue ) _ As com.sun.star.beans.PropertyValue Dim oPropertyValue As New com.sun.star.beans.PropertyValue If Not IsMissing( cName ) Then oPropertyValue.Name = cName EndIf If Not IsMissing( uValue ) Then oPropertyValue.Value = uValue EndIf MakePropertyValue() = oPropertyValue End Function Sub SaveAsOOO( cInFile, cOutFile ) On Error Goto ErrorHandler cInURL = ConvertToURL( cInFile ) oDoc = StarDesktop.loadComponentFromURL( cInURL, "_blank", 0, _ Array( MakePropertyValue( "Hidden", True ), ) ) cOutURL = ConvertToURL( cOutFile ) oDoc.storeAsURL( cOutURL, Array() ) oDoc.close( True ) Exit Sub ErrorHandler: Resume Next End Sub </script:module>
下記の参考サイトのソースをベースに作成しました。SaveAsOOOにはエラーハンドラを追加しました。これを追加しておかないと、ファイルが見つからないなど、何らかのエラーが生じた際にメッセージボックスが表示されてしまい、バッチ処理には向きません。
2. ~/.openoffice.org/3/user/basic/Standard/script.xlb
<?xml version="1.0" encoding="UTF-8"?>
<!DOCTYPE library:library PUBLIC "-//OpenOffice.org//DTD OfficeDocument 1.0//EN" "library.dtd">
<library:library xmlns:library="http://openoffice.org/2000/library" library:name="Standard" library:readonly="false" library:passwordprotected="false">
 <library:element library:name="Export"/>
</library:library>
登録したマクロをシェルから呼ぶには以下のようにします。
ooffice -invisible -nologo 'macro:///Standard.Export.SaveAsOOO("/tmp/example.ppt", "/tmp/example.odp")'
仕様かどうかはわかりませんが、-nologoを付けないと処理がバックグラウンドで行われるようです。
ソースコード
上記のマクロを呼び出すpythonコードを作成しました。
import os, stat


def convert_from(from_path, to_path):
    updated_at = os.stat(to_path)[stat.ST_MTIME] if os.path.exists(to_path) else None
    command = 'ooffice -invisible -nologo '\
        '\'macro:///Standard.Export.SaveAsOOO("{0}", "{1}")\''
    # TODO escape from_path and to_path
    os.system(command.format(from_path, to_path))
    if not os.path.exists(to_path):
        raise Exception, 'Failed to convert to OpenOffice format, not exists'
    if os.stat(to_path)[stat.ST_MTIME] == updated_at:
        raise Exception, 'Failed to convert to OpenOffice format, not updated'


def _test():
    import tempfile
    tempfd, temppath = tempfile.mkstemp()
    convert_from('/tmp/validfile.ppt', temppath)
    os.remove(temppath)

    tempfd, temppath = tempfile.mkstemp()
    #convert_from('/tmp/invalidfile.ppt', temppath)
    os.remove(temppath)

    temppath = '/tmp/out.odp'
    convert_from('/tmp/validfile.ppt', temppath)
    os.remove(temppath)

    #convert_from('/tmp/invalidfile.ppt', temppath)
    #os.remove(temppath)

if __name__ == '__main__':
    _test()
変換が正常に行われたかどうかは、リターンコードでは判別できません。
出力ファイルが存在しない、もしくは出力ファイルが更新されていないときは変換に失敗したと判断します。
ALAssetsLibraryでiPhone,iPadの写真フォルダにアクセスする
//  MyAssetManager.h

#import <Foundation/Foundation.h>
#import <AssetsLibrary/AssetsLibrary.h>

@interface MyAssetsManager : NSObject
{
    ALAssetsLibrary *assetsLibrary_;
}

- (void)addObserverForAssetsLibraryChange:(id)anObserver
                                 selector:(SEL)aSelector;
- (void)removeObserverForAssetsLibraryChange:(id)anObserver;
- (void)enumerateAssets;
@end
//  MyAssetManager.m

#import "MyAssetsManager.h"

#define MYASSETSMANAGER_ASSETSNOTIFICATION_NAME @"ALAssetsLibraryChangedNotification"

@implementation MyAssetsManager
- (id)init
{
    assetsLibrary_ = [[ALAssetsLibrary alloc] init];
    return self;
}

- (void)dealloc
{
    [assetsLibrary_ release];
    [super dealloc];
}

- (void)addObserverForAssetsLibraryChange:(id)anObserver
                                 selector:(SEL)aSelector
{
    NSNotificationCenter *defaultCenter = [NSNotificationCenter defaultCenter];
    [defaultCenter addObserver:anObserver
                      selector:aSelector
                          name:MYASSETSMANAGER_ASSETSNOTIFICATION_NAME
						object:nil];
}

- (void)removeObserverForAssetsLibraryChange:(id)anObserver
{
    NSNotificationCenter *defaultCenter = [NSNotificationCenter defaultCenter];
    [defaultCenter removeObserver:anObserver
                             name:MYASSETSMANAGER_ASSETSNOTIFICATION_NAME
                           object:nil];
}

- (void)enumerateAssets
{
    __block NSUInteger assetCount = 0;

    void (^assetResultBlock)(ALAsset *, NSUInteger, BOOL *) = ^(ALAsset *asset, NSUInteger index, BOOL *stop)
    {
	if (*stop) {
	    NSLog(@"Stop enumerating assets.");
	} else if (!asset) {
	    NSLog(@"End of the group.");
	} else {
             // TODO
             NSDictionary *urls = [asset valueForProperty:ALAssetPropertyURLs];
             NSLog(@"%06d:%@", assetCount, urls);
             ++assetCount;
	}
    };

    void (^resultBlock)(ALAssetsGroup *, BOOL *) = ^(ALAssetsGroup *group, BOOL *stop)
    {
        if (*stop) {
            NSLog(@"Stop enumerating groups.");
        } else if (!group) {
            NSLog(@"End of enumation.");
        } else {
            ALAssetsFilter *assetsFilter = [ALAssetsFilter allPhotos];
	   [group setAssetsFilter:assetsFilter];
            NSInteger numberOfAssets = [group numberOfAssets];
            NSString *groupName = [group valueForProperty:ALAssetsGroupPropertyName];
            NSLog(@"%@:num:%d", groupName, numberOfAssets);
            [group enumerateAssetsUsingBlock:assetResultBlock];
        }
    };

    void (^failureBlock)(NSError *) = ^(NSError *error)
    {
        NSLog(@"Exception in enumerating assets. %@", error);
    };

    [assetsLibrary_ enumerateGroupsWithTypes:ALAssetsGroupAll
                                  usingBlock:resultBlock
                                failureBlock:failureBlock];
}

@end
#undef MYASSETSMANAGER_ASSETSNOTIFICATION_NAME
TODOコメントあたりでメタデータの取得などいろいろできます。
フィルタや対象グループを変更することで、写真や映像などのフィルタリングが出来ます。
"ALAssetsLibraryChangedNotification"に登録することで写真フォルダの変更等を知ることができます。ただし"ALAssetsLibraryChangedNotification"ではiTunesの同期処理による写真フォルダの変更には対応できないようです。
XCodeのiPhone,iPadプロジェクトの設定
XCodeでiPhone,iPad用アプリを作成する際にまず設定していること。
LOG関数の設定
// ProjectName_Prefix.pch

#ifdef DEBUG
    #define LOG(...) NSLog(__VA_ARGS__);
    #define LOG_METHOD NSLog(@"%s", __func__);
#else
    #define LOG(...) ;
    #define LOG_METHOD ;
#endif
実行可能ファイルの環境に設定される変数の設定
- NSZombieEnabledをYESにして追加する。
- リリース時には削除する。
参考

iOS SDK Hacks ―プロが教えるiPhoneアプリ開発テクニック
- 作者: 吉田悠一,高山征大,UICoderz
- 出版社/メーカー: オライリージャパン
- 発売日: 2010/10/23
- メディア: 単行本(ソフトカバー)
- 購入: 28人 クリック: 465回
- この商品を含むブログ (33件) を見る
Google Chromium OS + Chromiumのビルド方法
Google Chromium OSをソースからビルドする。ただしChromiumはローカルのソースを使用する。
[1]Chromium OS Developer Guide - The Chromium Projects
[2]Build Instructions (Chromium OS on Linux) - The Chromium Projects
以下は2010/12/23時点でのビルドログ兼ビルド方法です。ビルド方法は頻繁に変更されるため、最新のビルド方法は[1][2]を参照してください。
はじめに
ホームディレクトリ(/home/USER_NAME)に以下のような作業ディレクトリを作成するとします。
必要に応じて読み換えてください。
/home/USER_NAME
    /google
        /chromium
        /chromiumos
ビルドマシン
準備
64ビット版Ubuntuのインストールとrootアクセス可能なアカウントの作成
Ubuntuのインストールに関しては他のサイトを参照してください。
Ubuntu Lucid 10.04が推奨されています。
~/$ uname -m
64ビット版でないといけません。上記のコマンドでx86_64と出力されれば64ビット版のようです。
Chromium OSのファイルサイズはソースのみで2GB、ビルド後は12GB、VMWare用イメージ等を作成すると15GB程度になります。
Chromiumのファイルサイズはソース・テストファイルのみで4GB、ビルド後は11GB程度になります。
合計で26GB程度使用するのでHDD容量には注意が必要です。
ビルドに必要なパッケージのインストール
[3]chromium - An open-source project to help move the web forward. - Monorail
[3]に書いてあるパッケージが必要です。インストール用のスクリプトが用意されているのでそれを利用します。
~/google$ wget http://src.chromium.org/svn/trunk/src/build/install-build-deps.sh
~/google$ sudo chmod +x install-build-deps.sh
~/google$ ./install-build-deps.sh
Do you want me to install them for you (y/N)  y

Gold is a new linker that links Chrome 5x faster than ld.
Don't use it if you need to link other apps (e.g. valgrind, wine)
REPLACE SYSTEM LINKER ld with gold and back up ld? (y/N) y
subversionのインストール
~/$ sudo apt-get install subversion
gitのインストールと設定
~/$ sudo aptitude install git-core gitk git-gui
~/$ git config --global user.email "you@example.com"
~/$ git config --global user.name "Your Name"
ソースコードの取得
depot_toolsの取得
[4]Install depot_tools - The Chromium Projects
[4]に書かれているdepot_toolsが必要です。
~/google$ wget http://src.chromium.org/svn/trunk/tools/depot_tools.zip
~/google$ unzip depot_tools.zip
gclientを設定する
~/google$ cd chromium
~/google/chromium$ gclient config http://src.chromium.org/svn/trunk/src
.gclientを編集する
solutions = [
  { "name"        : "src",
    "url"         : "http://src.chromium.org/svn/trunk/src",
    "custom_deps" : {
    },
    "safesync_url": "",
  },
  { "name"        : "cros_deps",
    "url"         : "http://src.chromium.org/svn/trunk/src/tools/cros.DEPS",
  },
]赤色の3行を追加します。
repoを設定する
~/google$ cd chromiumos
~/google/chromiumos$ repo init -u http://git.chromium.org/git/manifest
emailなどのビルドユーザ情報やターミナル上での文字の色の設定を行う。
-m minilayout.xmlのオプションを付けると取得するソース量が減るようです。
Chromium OSのソースを取得する
~/google/chromiumos$ repo sync
-m minilayout.xmlオプション無しで5時間程度かかりました。21万ファイル。1.9GB
ビルド
(任意)ソースの変更
ちゃんとローカルのChromiumのソースが使用されたかどうか確かめるためにChromiumのソースを少し変更しました。
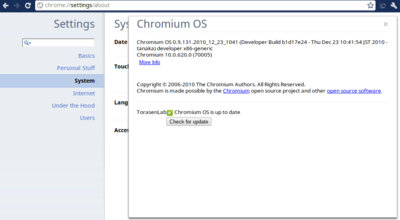
~/google/chromium/src/chrome/browser/resources/options/about_page.htmlが[About Chromium OS]として表示されるHTMLファイルです。一部にTorasenLabと追加しておきました。
ビルド環境を作成する
~/google/chromiumos$ cd src/scripts/
~/google/chromiumos/src/scripts$ ./make_chroot
10分程度かかりました。~/google/chromiumosディレクトリにchrootディレクトリが作成されます。このディレクトリはrmで削除してはいけないようです。
ビルド環境に入る
~/google/chromiumos/src/scripts$ ./enter_chroot.sh --chrome_root=/home/USER_NAME/google/chromium
--chrome_rootにChromiumのソースディレクトリを指定します。絶対パスで指定する必要があるのかもしれません。~/google/chromiumではビルドに失敗しました。
boardを設定する
(cros-chroot) ~/trunk/src/scripts $./setup_board --board=x86-generic --default
ここではtargetをx86-genericにしています。
x86互換CPU用には x86-generic、ARMCPU用には arm-genericに設定します。
3分程度かかりました。
共有ユーザアカウントを設定する
(cros-chroot) ~/trunk/src/scripts $./set_shared_user_password.sh
ターミナル上でsudoを使用する際に必要となります。
cros_workonを起動する
(cros-chroot) ~/trunk/src/scripts $./cros_workon start chromeos-base/libcros
(cros-chroot) ~/trunk/src/scripts $repo sync
ローカルのChromiumソースを使用するように設定する
(cros-chroot) ~/trunk/src/scripts $export CHROME_ORIGIN=LOCAL_SOURCE
(cros-chroot) ~/trunk/src/scripts $export FEATURES="-usersandbox"
imageを作成する
(cros-chroot) ~/trunk/src/scripts $./build_image
--withdev --noenable_rootfs_verificationフラグは開発者でもない限りつけないほうが良いらしい。10分程度かかりました。
イメージの作成
(任意)USBメモリにイメージを書き込む
4GB以上のUSBメモリをビルドマシンに挿入しておく。
(cros-chroot) ~/trunk/src/scripts $./image_to_usb.sh --to=/dev/sdX
--from=../build/images/SUBDIRオプションを追加するとバージョンを指定できます。SUBDIRはx86-generic/0.9.131.2010_12_23_1037-a1のようなバージョンやビルド日時をあらわすディレクトリです。
--fromオプションを追加しないと最新版が選択されます。
--to=/dev/sdXでChromium OSイメージを書き込むUSBを指定します。
中にはUSBメモリと認識しないデバイスがあるようですが、その場合は--force_non_usbオプションを追加します。
(任意)QEmu用イメージを作成する
(cros-chroot) ~/trunk/src/scripts $./image_to_vm.sh
~/google/chromiumos/src/build/images/SUBDIR/にchromiumos_qemu_image.binが作成されます。
(任意)VMWare用イメージを作成する
QEmuをビルド環境にインストールする。
(cros-chroot) ~/trunk/src/scripts $ sudo emerge app-emulation/qemu-softmmu
イメージを作成する。
(cros-chroot) ~/trunk/src/scripts $./image_to_vm.sh --format=vmware
~/google/chromiumos/src/build/images/SUBDIR/にchromiumos.vmxとide.vmdkが作成されます。
ビルド環境から出る
(cros-chroot) ~/trunk/src/scripts $exit
実行
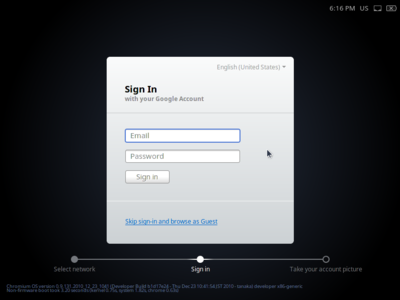
QEmuでの実行結果のスクリーンショット。[About Chromium OS]ページにビルドユーザの情報などが載ります。追加したTorasenLabという文字も表示されています。
(任意)USBメモリからブートする
ビルドしたChromium OSがうまく動作するかどうかはハードウェアに依存するようです。
Let's note CF-F8、Let's note CF-W7ではうまく動作しました。
[5]Developer Hardware - The Chromium Projects
[5]でリストアップされているハードウェアではうまく動作するようです。
(任意)USBメモリからHDDへインストールする
- USBメモリからChromium OSを起動する
- ログインする
- Ctrl + Alt + tを押してターミナルを起動します
- HDDにインストールする
crosh> shell
chronos@localhost / $ /usr/sbin/chromeos-install
chronos@localhost / $ exit
crosh> exit
(任意)QEmuで起動する
~$ sudo kvm -m 1024 -vga std -pidfile /tmp/kvm.pid -net nic,model=e1000  -net user,hostfwd=tcp::922-:22 \
        -hda ~/google/chromiumos/src/build/images/SUBDIR/chromiumos_qemu_image.bin
など。
(任意)VMWareで起動する
- WMWareを起動する
- chromiumos.vmxを読み込む
テキストを走査する
備忘録も兼ねてPowerPointプレゼンテーション内のテキストを走査するためのクラスを作成しました。
走査する単位はCharacter, Run, Word, Line, Sentence, Pragraphから選択できます。
using PowerPoint = Microsoft.Office.Interop.PowerPoint;
using Office = Microsoft.Office.Core;

namespace TorasenLib
{
    public class TextTraverser
    {
        public enum TraverseUnit
        {
            Character,
            Run,
            Word,
            Line,
            Sensence,
            Paragraph
        };

        public delegate void ForEachRun(Office.TextRange2 unit);
        private delegate Office.TextRange2 Decompose(Office.TextRange2 textrange, int start, int length);

        private readonly ForEachRun procedure_;
        private readonly Decompose decompose_;

        public TextTraverser(ForEachRun procedure, TraverseUnit unit)
        {
            if (procedure == null) {
                throw new System.ArgumentNullException("procedure");
            }
            procedure_ = procedure;
            switch (unit) {
                case TraverseUnit.Character:
                    decompose_ = new Decompose(GetCharacters_);
                    break;
                case TraverseUnit.Run:
                    decompose_ = new Decompose(GetRuns_);
                    break;
                case TraverseUnit.Word:
                    decompose_ = new Decompose(GetWords_);
                    break;
                case TraverseUnit.Line:
                    decompose_ = new Decompose(GetLines_);
                    break;
                case TraverseUnit.Sensence:
                    decompose_ = new Decompose(GetSentences_);
                    break;
                case TraverseUnit.Paragraph:
                    decompose_ = new Decompose(GetParagraphs_);
                    break;
                default:
                    System.Diagnostics.Debug.Assert(false, "should never get here");
                    break;
            }
        }

        public void Traverse(PowerPoint.Presentations presentations)
        {
            foreach (PowerPoint.Presentation presentation in presentations) {
                Traverse(presentation);
            }
        }

        public void Traverse(PowerPoint.Presentation presentation)
        {
            Traverse(presentation.Slides);
        }

        public void Traverse(PowerPoint.Slides slides)
        {
            foreach (PowerPoint.Slide slide in slides) {
                Traverse(slide);
            }
        }

        public void Traverse(PowerPoint.SlideRange sliderange)
        {
            foreach (PowerPoint.Slide slide in sliderange) {
                Traverse(slide);
            }
        }

        public void Traverse(PowerPoint.Slide slide)
        {
            Traverse(slide.Shapes);
        }

        public void Traverse(PowerPoint.Shapes shapes)
        {
            foreach (PowerPoint.Shape shape in shapes) {
                Traverse(shape);
            }
        }

        public void Traverse(PowerPoint.ShapeRange shaperange)
        {
            foreach (PowerPoint.Shape shape in shaperange) {
                Traverse(shape);
            }
        }

        public void Traverse(PowerPoint.Shape shape)
        {
            if (shape.HasTextFrame == Office.MsoTriState.msoTrue) {
                Traverse(shape.TextFrame2);
            }
            if (shape.HasTable == Office.MsoTriState.msoTrue) {
                foreach (PowerPoint.Row row in shape.Table.Rows) {
                    foreach (PowerPoint.Cell cell in row.Cells) {
                        if (cell.Shape.HasTextFrame == Office.MsoTriState.msoTrue) {
                            Traverse(cell.Shape.TextFrame2);
                        }
                    }
                }
            }

            if (shape.Type == Office.MsoShapeType.msoGroup) {
                foreach (PowerPoint.Shape child in shape.GroupItems) {
                    Traverse(child);
                }
            }
        }

        private void Traverse(PowerPoint.TextFrame2 textframe2)
        {
            if (textframe2.HasText == Office.MsoTriState.msoTrue) {
                Traverse(textframe2.TextRange);
            }
        }

        private void Traverse(Office.TextRange2 textrange2)
        {
            System.Diagnostics.Debug.Assert(procedure_ != null);
            System.Diagnostics.Debug.Assert(decompose_ != null);
            int length = 0;
            int idx = 1;
            while (length < textrange2.Length) {
                Office.TextRange2 unit = decompose_(textrange2, idx, -1);
                procedure_(unit);
                length += unit.Length;
                ++idx;
            }
        }

        private Office.TextRange2 GetCharacters_(Office.TextRange2 textrange, int start, int length)
        {
            return textrange.get_Characters(start, length);
        }

        private Office.TextRange2 GetRuns_(Office.TextRange2 textrange, int start, int length)
        {
            return textrange.get_Runs(start, length);
        }

        private Office.TextRange2 GetWords_(Office.TextRange2 textrange, int start, int length)
        {
            return textrange.get_Words(start, length);
        }

        private Office.TextRange2 GetLines_(Office.TextRange2 textrange, int start, int length)
        {
            return textrange.get_Lines(start, length);
        }

        private Office.TextRange2 GetSentences_(Office.TextRange2 textrange, int start, int length)
        {
            return textrange.get_Sentences(start, length);
        }

        private Office.TextRange2 GetParagraphs_(Office.TextRange2 textrange, int start, int length)
        {
            return textrange.get_Paragraphs(start, length);
        }
    }
}
以下はRun単位で走査し、奇数番目に走査したテキストに二重線を設定する例です。
using PowerPoint = Microsoft.Office.Interop.PowerPoint;
using Office = Microsoft.Office.Core;

public void Test(PowerPoint.Presentation presentation)
{
    bool doubleStrike = true;
    TorasenLib.TextTraverser.ForEachRun procedure = new TorasenLib.TextTraverser.ForEachRun(
        delegate(Office.TextRange2 unit)
        {
            if (doubleStrike) {
                unit.Font.DoubleStrikeThrough = Office.MsoTriState.msoTrue;
            }
            doubleStrike = !doubleStrike;
        });
    TorasenLib.TextTraverser.TraverseUnit traverseUnit = TorasenLib.TextTraverser.TraverseUnit.Run;

    TorasenLib.TextTraverser traverser = new TorasenLib.TextTraverser(procedure, traverseUnit);
    traverser.Traverse(presentation);
}
それぞれの走査単位での実行結果。
Characterは1文字ごと、Runはフォント情報が等しいブロックごと、Wordは単語ごと、Lineは行ごと、Sentenceは文ごと、Paragraphは段落ごとに走査するようです。
ただ、Sentenceの区切り方法がどうなっているのかは知りません。SentenceとParagraphの実行結果が同じになっています。

Google Chromium OSのビルド方法
Google Chromium OSをソースからビルドする。
[1]Chromium OS Developer Guide - The Chromium Projects
以下は2010/12/17時点でのビルドログ兼ビルド方法です。ビルド方法は頻繁に変更されるため、最新のビルド方法は[1]を参照してください。
はじめに
ホームディレクトリ(/home/USER_NAME)に以下のような作業ディレクトリを作成するとします。
必要に応じて読み換えてください。
/home/USER_NAME
    /google
        /chromiumos
ビルドマシン
準備
64ビット版Ubuntuのインストールとrootアクセス可能なアカウントの作成
Ubuntuのインストールに関しては他のサイトを参照してください。
Ubuntu Lucid 10.04が推奨されています。
~/$ uname -m
64ビット版でないといけません。上記のコマンドでx86_64と出力されれば64ビット版のようです。
Chromium OSのファイルサイズはソースのみで2GB、ビルド後は12GB、VMWare用イメージ等を作成すると15GB程度になるのでHDD容量には注意が必要です。
ビルドに必要なパッケージのインストール
[2]chromium - An open-source project to help move the web forward. - Monorail
ビルド手順更新の際に[1]からは削除されたようですが、恐らく[2]に書いてあるパッケージが必要です。インストール用のスクリプトが用意されているのでそれを利用します。
~/google$ wget http://src.chromium.org/svn/trunk/src/build/install-build-deps.sh
~/google$ sudo chmod +x install-build-deps.sh
~/google$ ./install-build-deps.sh
Do you want me to install them for you (y/N)  y

Gold is a new linker that links Chrome 5x faster than ld.
Don't use it if you need to link other apps (e.g. valgrind, wine)
REPLACE SYSTEM LINKER ld with gold and back up ld? (y/N) y
gitのインストールと設定
~/$ sudo aptitude install git-core gitk git-gui
~/$ git config --global user.email "you@example.com"
~/$ git config --global user.name "Your Name"
ソースコードの取得
depot_toolsの取得
[3]Install depot_tools - The Chromium Projects
[3]に書かれているdepot_toolsが必要です。
~/google$ wget http://src.chromium.org/svn/trunk/tools/depot_tools.zip
~/google$ unzip depot_tools.zip
repoを設定する
~/google$ cd chromiumos
~/google/chromiumos$ repo init -u http://git.chromium.org/git/manifest
emailなどのビルドユーザ情報やターミナル上での文字の色の設定を行う。
-m minilayout.xmlのオプションを付けると取得するソース量が減るようです。
Chromium OSのソースを取得する
~/google/chromiumos$ repo sync
-m minilayout.xmlオプション無しで5時間程度かかりました。21万ファイル。1.9GB
ビルド
ビルド環境を作成する
~/google/chromiumos$ cd src/scripts/
~/google/chromiumos/src/scripts$ ./make_chroot
10分程度かかりました。~/google/chromiumosディレクトリにchrootディレクトリが作成されます。このディレクトリはrmで削除してはいけないようです。
boardを設定する
(cros-chroot) ~/trunk/src/scripts $./setup_board --board=x86-generic --default
ここではtargetをx86-genericにしています。
x86互換CPU用には x86-generic、ARMCPU用には arm-genericに設定します。
3分程度かかりました。
共有ユーザアカウントを設定する
(cros-chroot) ~/trunk/src/scripts $./set_shared_user_password.sh
ターミナル上でsudoを使用する際に必要となります。
imageを作成する
(cros-chroot) ~/trunk/src/scripts $./build_image
--withdev --noenable_rootfs_verificationフラグは開発者でもない限りつけないほうが良いらしい。10分程度かかりました。
イメージの作成
(任意)USBメモリにイメージを書き込む
4GB以上のUSBメモリをビルドマシンに挿入しておく。
(cros-chroot) ~/trunk/src/scripts $./image_to_usb.sh --to=/dev/sdX
--from=../build/images/SUBDIRオプションを追加するとバージョンを指定できます。SUBDIRはx86-generic/0.9.131.2010_12_17_1141-a1のようなバージョンやビルド日時をあらわすディレクトリです。
--fromオプションを追加しないと最新版が選択されます。
--to=/dev/sdXでChromium OSイメージを書き込むUSBを指定します。
中にはUSBメモリと認識しないデバイスがあるようですが、その場合は--force_non_usbオプションを追加します。
(任意)QEmu用イメージを作成する
(cros-chroot) ~/trunk/src/scripts $./image_to_vm.sh
~/google/chromiumos/src/build/images/SUBDIR/にchromiumos_qemu_image.binが作成されます。
(任意)VMWare用イメージを作成する
QEmuをビルド環境にインストールする。
(cros-chroot) ~/trunk/src/scripts $ sudo emerge app-emulation/qemu-softmmu
イメージを作成する。
(cros-chroot) ~/trunk/src/scripts $./image_to_vm.sh --format=vmware
~/google/chromiumos/src/build/images/SUBDIR/にchromiumos.vmxとide.vmdkが作成されます。
ビルド環境から出る
(cros-chroot) ~/trunk/src/scripts $exit
実行
QEmuでの実行結果のスクリーンショット。[About Chromium OS]ページにビルドユーザの情報などが載ります。
(任意)USBメモリからブートする
ビルドしたChromium OSがうまく動作するかどうかはハードウェアに依存するようです。
Let's note CF-F8では動作しましたが、Let's note CF-W7ではethernetを認識しませんでした。
[4]Developer Hardware - The Chromium Projects
[4]でリストアップされているハードウェアではうまく動作するようです。
(任意)USBメモリからHDDへインストールする
- USBメモリからChromium OSを起動する
- ログインする
- Ctrl + Alt + tを押してターミナルを起動します
- HDDにインストールする
crosh> shell
chronos@localhost / $ /usr/sbin/chromeos-install
chronos@localhost / $ exit
crosh> exit
(任意)QEmuで起動する
~$ sudo kvm -m 1024 -vga std -pidfile /tmp/kvm.pid -net nic,model=e1000  -net user,hostfwd=tcp::922-:22 \
        -hda ~/google/chromiumos/src/build/images/SUBDIR/chromiumos_qemu_image.bin
など。
(任意)VMWareで起動する
- WMWareを起動する
- chromiumos.vmxを読み込む
VMWareで起動したときにethernetを認識しないときは、chromiumos.vmxをテキストエディタで開いて
ethernet0.virtualDev = "e1000"
を追加すれば動作する場合があります。詳しくは[5]を参照してください。
[5]Google グループ


